Plastic Soldier Company WWII Russian Infantry - Part Six: First Figure Completed!
Here is the first figure 100% completed. I think that he turned out pretty well!
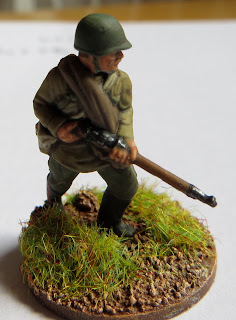 After the application of the Army Painter Dip - Medium Tone had dried I only painted a few more things; I put some rose on his lower lip; I painted skin highlights on his nose, chin and cheek bones; I varnished with Pebeo Matte varnish mixed 1:1 with water.
 Finally, I put black on the metal bits and then rubbed a #2 HB pencil on them. Painting and flocking the base finished it off.
 This Soviet rifleman looks really good for the modest amount of time that put into him. Again, it isn't my best painting standard, but the quantity of figures that you can quickly make has a quality of its own. The Base-Dip-Highlight technique gets nice looking figures on the table quickly.


Nice work - the wash/dip is perfect for WW2 (& WW1) figures, IMO. Your nice basing really sets it off to. Best, Dean
ReplyDeleteDeanM - Thanks! The mid-tone does pretty well with the earthy colors of the Soviet uniform. Part of me wants to go in and put extra highlights in and really get nuts on them. But I promised myself that I would keep everything to a minimum after the dip on these figures. My friends were just making fun of me this weekend about how I never finish projects. This time, they will be wrong!
DeleteThanks for the words of support! - Jeff
Your test mini has come out really well; I use a similar method for my 28mm minis. I look forward to seeing mor of them!
ReplyDelete