Speed Painting Napoleonic French Infantry
After my initial success on my first Napoleonic figure speed painted with Games Workshop Contrast Paints, I thought I'd quickly paint two more. It doesn't take any time at all!


Quickly Finished
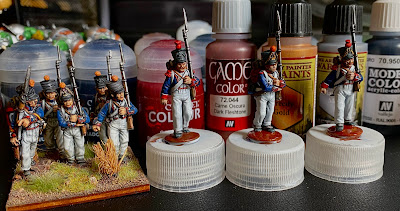
Here are the three figures on their white caps that I painted with Contrast Paints. Adjacent to them are figures painted in the Foundry 3-step method. I was able to complete the second two in under an hour. When zoomed in really close you can see the eyes, etc. on the Foundry-style figures. But from a foot away that disappears and the Contrast Painted models shine like gems. They are beautiful.

Once I undercoated with Corax White spray and drybrushed with Vallejo White, over half of the model was complete. Quickly covering the rest of the model with Contrast Paints took me to the finish line. Look and how nice that shako looks with the Templar Black on it. Every detail is picked out.

Contrast Speed Painting Tips
The fast painting was achieved by:
- Drybrushing white onto the Corax spray – it makes a great white and it pre-highlights the subsequent Contrast Paints (look at the knuckles)
- Single-coating the Contrast paints – they highlight and shade in one application
- Using Contrast Paint Templar Black to blackline – the nature of the paint makes it pull into the recesses leaving a light gray blend before the hard black shadow
- Minimize touch-ups – do as many colors as possible before circling back to fix overspills with Corax White from the pot

The picture above shows the painting in progress. The thing that slowed me down was brush control. If I made a mistake, I had to go back and fix it with white and then re-apply the color. Brush control takes time to master, but I noticed I was much faster on my third figure than I was on my first.
The only applied highlight was the white. I added a few strokes here and there on the pants and belting. It took less than a minute per figure. The metals were done in the old fashioned way: black undercoat and then Army Painter metallic paint.
This experiment was a huge success... so much so that I decided to try out this technique on some upcoming English Civil War figures.


I was at your Historicon class but I have lost my instruction paper with the colors listed on it. Is there anyway you could email it to me?
ReplyDeleteHere you go, Andrew! But, as I mentioned in the class, if I were starting now I would strongly consider Army Painter or Vallejo. Both are excellent and about half the price!
Delete+ + + + +
Games Workshop Contrast Paints (or Vallejo/AP)
Face/hands: Gulliman Flesh or Darkoath Flesh
Coat: Leviadon Blue
Blanket/gaiters/crotchV: Basilicanum Gray
Shako/shoes/scabbard: Black Templar
Hair/pack: Gore Grunta Fur
Cuffs/collar: Blood Angels Red
Musket: Wyldwood
Fix errors with light gray paint, check cuff piping with VallejoMC Sky Gray
Black lining straps: Black Templar thin brush using north to south strokes
Metals: black undercoat or CP Black Legion > metallic paint
Straps, highlights: VMC White and leave gray on strap ends
Paint base green or brown and varnish