Sanding sponges are an improvement over normal sanding paper as they smoothly distribute the sanding pressure over the surface and are therefore gentler on a model. You get a smoother finished piece. By using nippers to remove a part from a plastic sprue far enough from the piece itself one can sand the nub smooth and avoid the white stress mark that can appear near the cut. Our friends who build Bandai's Gundam kits use this technique all of the time to erase those nubs and avoid having to paint their models. When finished with 2500 grit the area shines as if it were never touched.
 |
| The finished sponges! They look pretty good. |
So, when I looked into purchasing sanding sponges, I was amazed at how expensive they were. $17 for only
four sponges from Tamiya?!? That is a lot! But then I spotted this idea and thought that I'd give it a try myself. It's one of those concepts that is so obvious once you see it that I'm embarrassed that I hadn't thought of it myself.
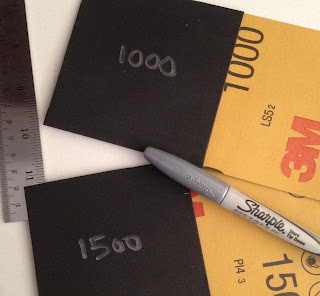
Purchase some
sanding paper in a multipack and some sticky-sided hobby foam sheets. I have seen the foam sheets at Michael's, Jo Ann's Fabrics and Hobby Lobby. First you stick the sandpaper to the foam and cut it into squares. Mark on the back of the foam the grit number so you don't get them confused. I used an old silver Sharpie for that task. If you want the foam to be thicker, add another sheet to make it spongier. That's it. You're done!
 |
| Easy ingredients: sandpaper and the sticky foam sheet. |
It's pretty simple and works great. Spent $1 on a sheet of foam and about $3.50 on sandpaper. One sheet of foam makes six 3.75" sanding sponge squares. I have enough sandpaper left over for 10+ more sponges... all I need are more foam sheets. I also get to choose the grit that I want as opposed to being stuck with Tamiya's numbers. I can go as smooth or as rough as I'd like.
 |
| Almost done. The sandpaper needs to be trimmed off of the edge of the foam. |
Who doesn't like to save money on their hobby supplies? Every dollar saved can be funneled into purchasing more figures to form a larger unpainted lead pile!


I agree - there is also the option of cutting them into smaller pieces for detailed sanding.
ReplyDeleteIn the UK - you can get budget priced sanding sponges/pads from Dulux Trade Centres.
Tony
Tony - You are right! In addition to cutting them into smaller squares, I sometimes make triangles to get them into tight areas.
DeleteAnother good trick is this: once an edge is used up, trim off 1/4" or so and then you have a new sanding surface!
The UK is superior for miniature supplies (and miniatures) as usual! I need to go on a vacation there soon! Thanks for the comment!