Tutorial - Painting Clothing Folds on 28mm Miniatures
One thing that I don't like when I look at triad painted miniatures is when the clothing folds don't seem to follow the figure. Instead, I see rings of color around the figure's arms and legs. Now I know that in art there are, according to Vilppu, seven basic folds to master. I may get there one day, but for now I cheat a bit by following one idea.
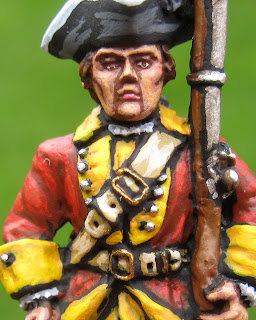
Although I am no expert when it comes to drapery shadows, one rule to remember is that the dark folds always point toward the tension. In other words, if fabric is bunched in the armpit, the folds will point toward the armpit. If a coat is perched on a shoulder, then the folds will radiate out from that point. Again, this is a gross simplification, but it gets you away from your figures looking like a striped barber pole or peppermint stick.

I used to paint highlights away from the tension (by that I mean starting a brushstroke near the recessed area and moving out toward the lighter area) when I first started painting miniatures. But I have found that painting toward the tension (recessed/shadow area, etc.) produces a nice point of highlight as it enters the shadow. This is because when your brush first touches the model it leaves a round blob of paint. When your brush finishes a stroke it generally leaves a narrowing point. It takes some practice not to overshoot into the darker color too much, but you get a much better highlight if you do it this way.

Try to keep your highlights in V or X shapes. Then combine a few of them by connecting them together. It makes an interesting zig-zag shape whose irregularity is pleasing to the eye. Watch for the underlying sculpt to see if it gives you a hint as to where the folds might be. It doesn't have to be perfect... I mess up all of the time. But if you make an effort the 9 good folds will hide the poorly done 10th one.
Keep a few of these ideas in mind while you are painting your figures and you'll get great results!


SquadPainter, another nice tutorial. I enjoyed it and hope to use your technique described sometime in the future. Life has been whirlwind of late and no time to work on any modelling/painting stuff. Your miniatures look really nice. The folds in the pants really add depth & animation to the figure. I hope to be able to do the same some day. Just wanted to let you know that there are sponges out here soaking up your tutorials Tank Taco.
ReplyDeleteTT - I'm glad that you were able to find some utility from this post. Like I said, I am no expert when it comes to this. But I have found that I get better results when I try it. Again, I am just trying to offer an alternative to the rings of color that appear on some miniatures. - Jeff
DeleteThat's great advice. I have been looking for this type of help for ages. Thank you.
ReplyDeleteHi Batman Sarah! I'm glad that you found this post helpful. I can't stand rings of color around miniatures. X and V shapes are helpful to avoid the stripy-sameness results. Keep painting. The more you do, the better you get! Thank you for your comment!
Delete