UM Models BA-10 - Airbrushed!
After assembling the 100+ part UM Models BA-10 I had to take a nap. That was a lot of work!
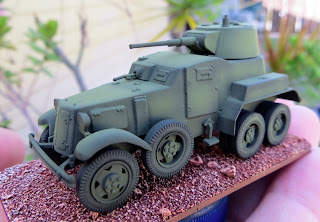

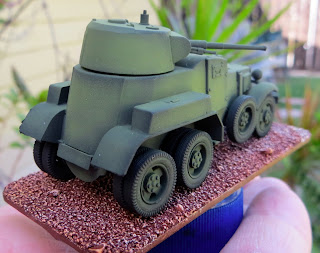

When I awoke I primed it black and then hit it with the airbrush. The first color was a 1:1 mix of Tamiya XF4 and XF58. Then I sprayed the center of the panels with a 2:1 mix of XF4 and XF51 (of course both paint mixtures were then thinned 1:1 with Tamiya thinner to make them spray properly).

This combination worked very well. The dark was just dark enough and the light looks good on the small model. I couldn't be more pleased!

Next up is the pin washing and weathering.


Very, very well done! Not sure I can do as good a job as this with my BA-10, I need to practise with my new airbrush first! :)
ReplyDeleteLook forward to seeing what you do next.
Stephen - It has taken me a few times with the airbrush to start to get the feel of it. I am still learning myself... notice that I haven't done any camo yet. Ha ha!
DeletePracticing on paper helps a lot. I have been doing that before I get down to spraying my vehicles. I'll do little dots and swirls. I also try to do targets. They are tricky!
Good luck with your BA-10. When my first tank didn't turn out as I was hoping, I just slopped some extra pigments on it to mask the results! - Jeff
Looks really good. Thanks for the mix ratios. your motivating me to get the airbrush out, and going. It's a aztek single action & I'm hoping to upgrade it in a year or so, until then I'll just try to get most out of single action. The base looks great to. If your ever motivated to do tutorial on bases, It would be much appreciated. Looking forward to next step. Thanks for sharing _ Tank Taco
ReplyDeleteTT - You should get the Aztek out and go for it. I have heard that the Aztek is a good little airbrush and that you can get good results from it.
DeleteI can do a tutorial on the bases in the future. In the meantime, take a look at my Victrix Austrians. I think that I spell out how I did it in there. Thanks again for reading! - Jeff
This comment has been removed by the author.
ReplyDeleteSquadPainter, for a first Airbrush, I think the Aztek(Mdl. A320) was a good buy ( it was about $45bucks). There are a lot of things I like about the brush. Most of all how easy it is to clean up ( unless you clog the tip), and the ability to change paint cups and the sides they mount on. Also the ability to change needle size easily by changing tip is a big plus. After air brushing a bit and wanting to do Camo with airbrush, I see the need for dual action. But, since I was just looking to replace a rattle can when I bought this air brush, I'm very happy with it. The one thing though on this brush that irritates me to no end, is an adjustment on the handle that is suppose to adjust the flow of paint. I have no idea if it is doing anything or not, and wish it just was not there. When I get around to getting a dual action I am considering getting a Aztek dual action or a Iwata HP-C plus.
ReplyDeleteThanks for pointing me to info on your site for basing. I actually had seen it before but forgot that it was on your site. In getting back into this hobby, I feel like I'm working on so many fronts, assembly, panting, basing, gaming, & blogging, thus making the learning curve steep. Your tutorial on basing is very nice. Are you using a Litko base on your armor? Once again thanks for all the helpful info. TT
TT - Yes, the Aztek is a quality piece of gear. It is amazing that they can sell it for less than $50.
DeleteI'm glad that you were able to find the basing information. Since my armor has to be based with all different sizes (as I wanted an extra 5mm down the sides, 10mm in front and about 7mm in the back, I realized that the Litko solution wasn't going to work. Each model has a different footprint. So I am using Evergreen Styrene Sheets (black) in .06 thickness. I measure, score and snap them to size, then I use fingernail clippers to round the edges. Finally a quick file job finishes the curve. I prime the top and edges with Armory Black Primer and then score the top with a knife. That seems to give the smooth plastic enough tooth to grab onto everything.
With the Litko bases being made of wood and semi-porous, you don't have to prime and score to have stuff adhere to it. The priming and scoring of the plastic may be overkill, but it doesn't take that long. - Jeff
A quick check on the web, seems to show that the Evergreen product is a much more economical way to go than the Litko, which seems to be a much more premium product. TT
ReplyDeleteTT - It all depends on the final product that you want. On my historicals that are en masse such as SYW and Napoleonics, I like the edges of the Litko bases and I leave them unpainted. The burned wood looks nice in my opinion and fits the period.
DeleteFor WWII that wouldn't do, so I tried the Evergreen bases and that gives the effect that I want with the modern equipment. It all comes down to preference on this stuff! - Jeff
SquadPainter - yeah, I get the idea of the base being used, changing depending on what is being mounted on it. Those Napoleonic are beautiful and the Litko base compliments them. Also the height of the base seems more proper on a 28mm figure. After a quick look at the Litko web site, it looked like the cost of the base was as much as a 1/72nd model that would be mounted on it. The Evergreen material looks perfect for what I'm looking to do.
DeleteI like to also say, after checking the tutorials on your blog, I'm was very impressed with your FoW 15mm figures, insignias and all. Wow! Again Thanks for all the info. TT
TT - Thanks for the compliments on the Napoleonics. I like the way that they turned out... both the French Foundry style and the French Army Painter dipped. I don't recall the Litko bases being that expensive, but I purchased them a while ago. I got a good stack of them and I knew that they would last me for years.
DeleteThe Evergreen stuff is nice too and I like it on the WWII. Whatever works, right?
I liked the Flames of War repaint as well. However, as I was doing the insignia I realized that perhaps 15mm wasn't the scale for me. Ha ha! I think that FoW is more about the armor whereas the 20mm scale has the ability to detail both the infantry and armor. Since I love infantry, I think that 20mm is going to work out better. It isn't that you can't do details on 15mm, it is just that it doesn't show up very well on the table. - Jeff