Armourfast Panzer III Ausf. J - Part 3
Here they are completely assembled! I still can't believe how quickly the two models went together... it was about an hour for each one and that was including the modifications that I made. Wait! Modifications? What? Read on...
 As I mentioned in a previous post I didn't like that the track area behind the wheels looked kind of flat and boring. I noticed on the box picture that there were some hydraulics and whatnot that I might be able to quickly add from some spare sprue. So I did. You can see it on the first and last wheels. In addition, I saw that there was a little hatch thing down there and that was simple to add. The before and after pix are below.
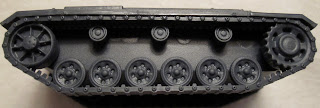
 It isn't the best scratch-build effort, but I think that it will do nicely after I add the pigment powders and get things muddy.

 I also drilled out the gun barrel a wee bit. I don't like solid ends on guns. So that ends the building process.

Now onto priming and painting!
Oh, I almost forgot: I also need to find some decals for these tanks. I wonder if my local hobby store, Discount Hobbies in San Diego, or maybe Brookhurst Hobbies has some?


Now onto priming and painting!
Oh, I almost forgot: I also need to find some decals for these tanks. I wonder if my local hobby store, Discount Hobbies in San Diego, or maybe Brookhurst Hobbies has some?


Comments
Post a Comment